Gerrit Niezen

Maker of open-source software and hardware.

I'm starting to learn the Zig programming language, and wanted to see how easy it is to load it in the browser with WebAssembly. I noticed that the official documentation only includes a Node.js example, so I thought I'd write up an example for the browser here.

Read more...

Fermenter vessel

It's been eight years since I last experimented with building my own bioreactor as part of the first BioHack Academy, organised by Waag Futurelab in Amsterdam. Reading George Monbiot's recent article in The Guardian about precision fermentation has me all excited about bioreactors and fermenters again, so much so that it's all I've been reading about this past week.

Up until recently, precision fermentation was mainly used to manufacture insulin and the rennet substitute, chymosin, used to make cheese. But precision fermentation can also be used to have microorganisms (yeast and bacteria) generate edible protein, instead of the usual macroorganisms (cows, sheep, pigs and chickens). Now there are companies using precision fermentation to make the casein protein found in milk and then creating ice cream and other diary products, like cream cheese. Impossible Foods use precision fermentation to make the heme protein found in meat and then creating burgers. Solar Foods literally creates protein out of thin air, using carbon dioxide and hydrogen as inputs to create an edible protein powder.

One of the four pillars of the Reboot Food manifesto, written by the RePlanet NGO and supported by Monbiot, requires precision fermentation technology to be open source:

The benefits of the food revolution should be shared with all, with new technologies made open source and corporate concentration actively mitigated.

However, as Sue Branford points out in the Guardian, almost all existing precision fermentation technology is patented by VC-funded startups or large corporations:

Even though Monbiot says that he would like poor countries all over the world to install fermentation tanks under local control, this seems unlikely. The technology, developed under corporate control, has been patented. Corporations driven by profits are unlikely to democratise control, and the technology is likely to be used by them to extend their reach over the natural world.

So far I could only find one company, SuperMeat, that is talking about the importance of open source in precision fermentation. And then only to develop a screening system for the ingredients used in precision fermentation.

Not finding any open-source precision fermentation projects online, I started looking for open-source bioreactors instead. Unfortunately most of these types of projects only built a prototype and have since been abandoned. I decided to do a search on GitHub for bioreactors and, sorting by most recently updated, came across Pioreactor.

Pioreactor is the open-source bioreactor project I've been wanting to exist for the past eight years. I don't know why I haven't heard of this project before, but I'm so glad that it exists and that they're due to start shipping their first kits soon. It looks like they've managed to develop a solid piece of hardware with working software, and I can't wait for it to become available so that I can start playing with it.

How do we go from the current corporate-captured present to an open-source future? Open-source bioreactor projects like Pioreactor may be part of the solution. While you're not going to grow any substantial amount of food in a Pioreactor, it provides an accessible and affordable platform for experimentation and getting started with precision fermentation.

Or as Adam Greenfield so eloquently puts it over on Mastodon:

In March 2020 I gave a talk to a local community group, Uplands Living Streets, about the DIY air quality monitor I built. I mentioned that I would love to design and build a solar-powered air quality monitor that's easy to install and modify. Quite a few folks seemed interested in the idea, so I decided to pursue building my own air quality monitor, including designing the circuit board myself.

I wanted to design something that was:

  • battery-powered and charging with a solar panel,
  • used long-range wireless communication, and
  • easily extended with other sensors.

It took me more than two years and three revisions of the hardware to get something that works, but it's finally ready. The enclosure design was the most challenging, given that it had to be weatherproof. The most recent version even encloses the antenna to remove another opening where water could possibly get in.

First monitor installed

Seeed's Fusion PCB assembly service manufactured both the second and third revisions of the hardware. My design won the Best Wio-E5 Fusion Case Study and I could use the Fusion PCB Assembly coupon prize towards building the third revision of the hardware. If you're designing something that makes use of the Wio-E5 LoRaWAN module, Seeed will help you out with free PCBA prototypes.

I placed the order for the Seeed Fusion PCBs on 24 May and only two days later the order was confirmed and they started procuring the components. On 2 June Seeed notified me that some resistors were out of stock and we agreed to replace them with another alternative. Less than two weeks later on 13 June the order was shipped. It only took three days to reach me here in the UK on 16 June! Going just over three weeks from placing an order to having an assembled PCB in your hand is not bad.

The Wio-E5 (previously called the LoRa-E5) is used to communicate with LoRaWAN networks like The Things Network and Helium. It's based on the STML32WL chipset, which includes both a microcontroller and a LoRa radio on the same chip! You can run your own software on the microcontroller, but it comes preinstalled with the LoRaWAN stack so you can use it as a LoRaWAN module. That means you connect to it from another microcontroller over a UART interface, and just send AT commands (e.g. AT+JOIN to join a network) to connect to a LoRaWAN network. I'm using the nRF52832 chip from Nordic as the main microcontroller, as it can easily be programmed with Espruino over Bluetooth!

The third revision changes the main processor module from the MDBT42Q module that's hard to get hold of at the moment, to an E73-2G4M04S1B that Seeed Fusion was able to source. Both modules use the Nordic nRF52832 chip internally. I also changed the 3.3V regulator to one that's in stock. The global electronic component shortage is still very much with us in 2022.

Other changes include changing to a 5V regulator with true shutdown, so that the particulate matter sensor can be turned off completely to reduce power consumption. I released a breakout board with the 5V regulator as a separate product on Tindie for sale!

Revision 3 of the PCB

I've started using a recycled PETG filament for the enclosure, and this is what the unit looks like half-assembled:

Half-assembled OpenAirMonitor

At first I attempted to use The Things Network for connectivity, but as there were no existing gateways in the area, I installed two of my own. Unfortunately this still didn't provide the coverage I needed, so I decided to look into using Helium. Thanks to them using crypto as incentive for people to install gateways, there is enough coverage in all the places where I intend to install the air quality monitors.

Second monitor with antenna cover

It was also relatively easy to hook up Helium to MyDevices Cayenne, a dashboard for visualising sensor data.

Here's a snapshot of one month of data from the first air quality monitor I installed on the roof of a restaurant in the neighbourhood:

One month of data

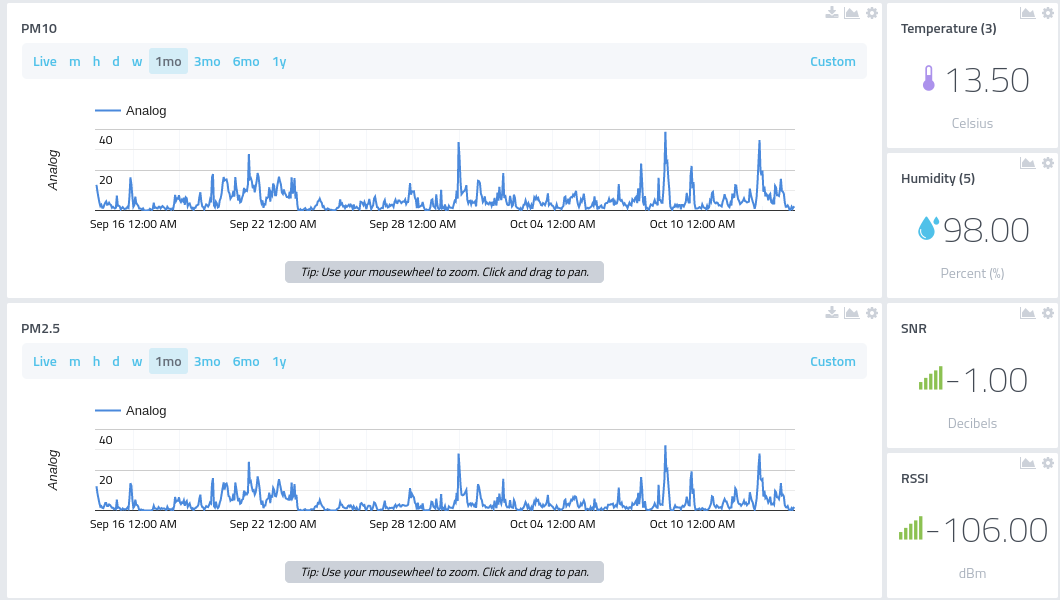
Here's another snapshot of a week worth's of data from another air quality monitor installed at a residential dwelling:

One week of data

There seems to be daily peaks around 9am and then again around 8-10pm. WHO air quality guidelines state that PM10 should be below 45 µg/m³ on average in a 24-hour period, so the good news is that does indeed seem to be the case.

Technical details are available on Hackaday and source files are available on GitHub. I hope to have circuit boards for building your own available on my Tindie and Lectronz stores soon, and will be posting documentation on how to build the monitor on Hackster as soon as it's ready!

#AirQuality

Discuss...

I just received a WCH CH32V307 RISC-V development board as part of the Hack It! RISC-V Design Challenge. What follows is a simple tutorial in getting started with running an RT-Thread example on the CH32V307 development board.

Installing and setting up the IDE

Setting up the debugger

  • Go to Run –> Debug Configurations..
  • Select GDB OpenOCD WCH Debugging / rt-thread.elf
  • Click on the Debugger tab
  • Enter the following under Config options: -f wch-riscv.cfg
  • Click Apply and then Debug

Setting up debug options in MounRiver Studio

Running the example

  • Plug your development board into USB port P9
  • Make sure the project is selected in the left-hand pane
  • Click the arrow to the right of the Run button, and select Run As –> OpenOCD WCH Debug:

Screenshot of Run As

If all goes well, it should build and and start running the example. If not, you may need to click Project-> Rebuild. Now, open up rt-thread/user/main.c in the project, and you'll see that it is supposed to flash an LED and print to the terminal. Now you may wonder: “Why am I not seeing LED1 flashing on the board?” I wondered this too, and found this in the CH32V307 evaluation board manual:

  1. LED: Controlled by connecting the extension connector J3 to the IO port of the master MCU

What this actually means is that you need a jumper cable to connect pin LED1, which is on the extension connector J3, to pin PA0, which is on both the extension connector and the Arduino interface. If you wire this up correctly, you'll hopefully see the LED blinking:

Blinking LED on CH32V307 dev board

If you also want to see the RT-Thread terminal, just connect to the board using your favourite serial terminal at 115200 bps, e.g. using minicom:

minicom -b 115200 -D /dev/ttyACM0

RT-Thread terminal in minicom

You don't need a separate USB-serial adapter, as the serial interface is provided by the WC-Link onboard the development board.

Any feedback and comments are appreciated!

#riscv #wch #electronics #ch32v307 #rtthread

Discuss...

If your electronics projects needs to talk to other devices, but you don't have access to WiFi, LoRaWAN is a great alternative. The Things Network (TTN) is a global collaborative Internet of Things ecosystem which allows devices to use the network for free. No payment or SIM cards are required like with NB-IoT or Helium, you just need to keep to the usage limits.

The problem is that there are very limited options for LoRaWAN modules, given the current global chip shortage. As I'm based in the UK, I'm looking specifically for 868MHz modules.

The RN2483 LoRaWAN module from Microchip used to be the de facto option when you don't want to run a LoRaWAN stack on your microcontroller. Unfortunately they are out of stock until 2022 or later. Luckily there are other options, so let's have a look at what's out there.

RAK3172

RAK Wireless has a range of LoRaWAN modules where different microcontrollers are combined with LoRa chips. The RAK3172 is their first module that uses the STM32WL, combining a microcontroller and LoRa on the same chip. It comes preinstalled with a LoRaWAN stack, so you can use it with your own microcontroller over a UART interface.

LoRa-E5

Seeed Studio's LoRa-E5 module also uses the STM32WL chip, and is also controlled over a UART interface if you use the preinstalled stack.

Unfortunately both the RAK and Seeed modules suffer from a high transmit power consumption bug, which look like it may not be able to fix in firmware without reducing the range significantly.

Ra-07H

Ai-Thinker's Ra-07H uses the ASR6501 chipset which also combines a LoRa transceiver with a microcontroller, and can also be controlled over a UART interface.

E78

Ebyte's E78 module is also based on the ASR6501 chipset. It appears that both the Ra-07H and E78 modules are compatible with TTN v3.

There are other LoRaWAN modules out there, like Move Solutions' STM32WL-based MAWLE-C1, but the ones above are ones that were actually in stock at the time of writing.

#IoT

The WHO Global Air Quality Guidelines mention five different pollutants, but what are they? Let's have a look.

Particulate matter (PM2.5 and PM10)

Particulate matter (PM) are inhalable particles smaller than 10 micrometer (PM10) and 2.5 micrometers (PM2.5) respectively. PM can consist of things like mineral dust, ammonia, nitrates and black carbon. The WHO limit is 15µg/m³ for PM2.5 and 45µg/m³ per 24 hours.

Carbon monoxide

Carbon monoxide is produced by burning wood and fossil fuels like natural gas, petrol and kerosene. You can't see, taste or smell it, but in high levels it can kill you. The WHO limit is 4mg/m³ per 24 hours.

Nitrogen dioxide

Nitrogen dioxide is reddish-brown in colour and is produced by fossil-fuel based heating, transport and power generation. It irritates airways and is linked to asthma and other respiratory diseases. The WHO limit is 25µg/m³ per 24 hours.

Ground-level ozone

When nitrogen oxides (NOx) react photochemically, they form ground-level ozone, which is a major component of smog. Ozone causes problems breathing, triggers asthma and leads to lung disease. The WHO limit is 100µg/m³ per 24 hours.

Sulfur dioxide

Sulfur dioxide is yet another pollutant produced by the combustion of fossil fuels like coal. It is a colourless gas that easily dissolves in water to form sulfuric acid. The WHO limit is 40µg/m³ per 24 hours.

Interesting how many of these air pollutants are fossil fuel based, and if we just stop burning stuff, it helps to prevent climate change too. Who knew?

#AirQuality #AirPollution

You already know that air pollution is a big problem, but you're not sure what you can do about it personally? Instead of waiting on the government or other people to solve the issue, here are 4 practical things you can do to improve air quality:

Stop burning stuff

Wood-burning stoves are one of the leading causes of air pollution in countries like the UK. Even a candle in your living room emits particulates. While we may have romantic or cozy feelings towards burning stuff, it's not great for our lungs.

Get on your bike

Even electric cars emit particulates when braking, so the best way to get yourself from A to B is on a bicycle or by walking. For longer journeys, public transport is the way to go.

Grow plants

Back in the 1980s NASA did this study to show that plants are great at purifying the air. Though later studies didn't quite replicate their results, having some beautiful green plants in your house is never a bad thing.

Switch to an induction stove

Gas stoves generate a lot of particulates during cooking, and you can cut down on this by using an induction stove instead. Is the convenience of a gas hob really worth the risk to your family's health? You may just find that a modern induction stove is just as convenient as the gas version.

With the current global chip shortage it can be challenging to find the right chip for your project that's actually in stock. I want to share some of my own challenges and what the options are. First up: What LiPo battery charger chips can be used with solar panels?

BQ24074

I first came across Texas Instrument's BQ24074 while looking at Adafruit's Universal USB / DC / Solar LiPo charger, which replaced their earlier MCP73781-based charger. It's relatively inexpensive ($0.81) and has an input voltage of up to 10V. Unfortunately this chip was out of stock when I ordered my board for SMT assembly, so I had to consider alternatives.

LT3652

Analog Device's LT3652 is used in Sparkfun's Sunny Buddy (MPPT Solar Charger), but it's a lot more expensive (around $5) than other chips and was also out of stock at the time of ordering.

CN3065 / CN3063

Consonance Electronic's CN3065 is used in Seeed Studio's LiPo Rider boards, as well as many low-cost solar battery charger boards on eBay. It's even cheaper than the BQ24074 at around $0.50, and it was available in its SOP8 package version CN3063 at JLCPCB when I placed my order. While it has been working great so far, it only has an input voltage of 6V, which could cause issues if you get high peak voltages on your solar panel over an extended period of time.

What are your favourite tools when building hardware?

Multimeter

If you're working with electronics, you need to be able to measure voltages, current, resistance and continuity. I mostly use a $10 multimeter to check if voltages are at the right levels and if there's continuity between various parts of the circuit. You'll notice there's no oscilloscope on this list. If you're only working with digital electronics, an oscilloscope feels like an unnecessary luxury. Most of what you need to figure out can be done with a multimeter and a logic analyser.

Logic analyser

My $10 logic analyser from eBay only measures up to 24MHz, but I've been able to successfully decode USB traffic that typically would be done with a USB analyser costing 50 times as much. The open-source Sigrok PulseView software supports a wide range of protocols for decoding, and is surprisingly easy to use.

Digital calipers

If you have a 3D printer, you're going to find digital calipers useful. It makes it so much easier to measure the dimensions of enclosures, components and circuit boards. I bought a super-cheap plastic digital caliper for $7, and so far it's been working just fine. I find myself using it so often that I could easily spend a little bit more on one that allows for finer adjustments.

USB-to-TTL converter

If there's any kind of UART serial communication between your microcontroller and peripherals, a $5 USB-to-TTL converter is a very useful addition to your toolbox.

Software-defined radio

This may sound like an unusual addition to this list, but being able to use a $10 DVB-T USB stick as a software-defined radio is priceless if you're working on a wireless project. I've used mine to measure the length of pulses while building a circuit to communicate with a remote control socket, and to check that what I'm building is actually sending data over the air.

#electronics #OpenHardware

Moisture sensor

To know when I need to water my seedlings in the propagator, I got an analogue capacitive soil moisture sensor for £3.67 (including P&P).

The pinout is a simple three-wire interface, with Vcc, ground and the analogue output pin. To read the values, I just needed to do the following in Espruino:

const moistureSensorPin = A5;
const airMoisture = 955;
const waterMoisture = 670;

pinMode(moistureSensorPin, 'analog');

const moisture = Math.round(analogRead(moistureSensorPin) * 1000);
const moisturePercent = Math.round(map(moisture, airMoisture, waterMoisture, 0, 100));
console.log(`Moisture is ${moisture} ~ ${moisturePercent} %`);

if (moisturePercent < 16) {
  console.log('Needs more water');
  // TODO: alarm notification
}

To get airMoisture and waterMoisture, I took readings from the sensor when it was dry and placed in a glass of water respectively. The map() function I got from the Arduino libraries:

function map(x, in_min, in_max, out_min, out_max) {
  // from https://www.arduino.cc/reference/en/language/functions/math/map/
  return (x - in_min) * (out_max - out_min) / (in_max - in_min) + out_min;
}

I place the sensor directly under the rockwool cubes of the seedlings to measure the moisture content.

Water level sensor

To detect the height of the water level sensor, I'm using a VL53L0X LIDAR sensor, that uses a laser and time-of-flight measurements to accurately measure distances between 50mm and 1200mm. It's pretty amazing that they can fit a laser and a detector into a package that's barely larger than a grain of rice.

The sensor uses an I2C interface, so I connected the pins as follows:

  • SDA pin to Espruino B3
  • SCL pin to Espruino B10
  • GND pin to ground
  • VIN pin to Espruino 3.3V
  • X pin to Espruino 3.3V (maybe not necessary)

To set it up in Espruino, you just do:

  I2C2.setup({ sda: B3, scl: B10 } );
  laser = require("VL53L0X").connect(I2C2);

To then perform a measurement, you do:

// measure water level
const distance = laser.performSingleMeasurement().distance;
if (distance > 20) {
  console.log(distance, 'mm');
  // TODO: minimum water level notification
}

I’m publishing this as part of 100 Days To Offload. You can join in yourself by visiting https://100daystooffload.com.

#100DaysToOffload #day67 #hydroponics

Enter your email to subscribe to updates.